Procedural Unfolding
Rigging + Animation Script | Maya, Python | 2020
For my individual project in the Pixar Undergraduate Program, I was originally inspired to create a "Paper City" that featured unfolding buildings as the camera flew by. I had hoped to develop a system that could unfold a mesh procedurally, which proved to be quite a difficult technical challenge during the short time frame that I had. One of my initial approaches included using bend deformers in Houdini, which resulted in unfolding (more so unrolling) that was rather too perfect or unrealistic and was overall not the type of motion I was looking for. A second approach was a more mathematical solution that sought to use quaternion rotations to perform per-face mesh unfolding, which was an even more technically advanced method that was not very art-directable or controllable. Under the time pressure of just two weeks to complete the entirety of a large-scale project, I unfortunately had to put this concept aside, instead hoping to learn as much as I could on procedural city generation.
While I was proud of my final Procedural Paper City and everything I had learned, my disappointment in being unable to figure out a viable solution had continuously lingered long after I left Pixar. It wasn't until a few months later that I had my moment of realization. While I was a TA for CS128: Intermediate Computer Animation, I had been helping the students learn to rig a character for the first time, and through becoming much more familiar with Maya's rigging tools, I realized that creating and animating a "wall skeleton" might have been the best solution this whole time.
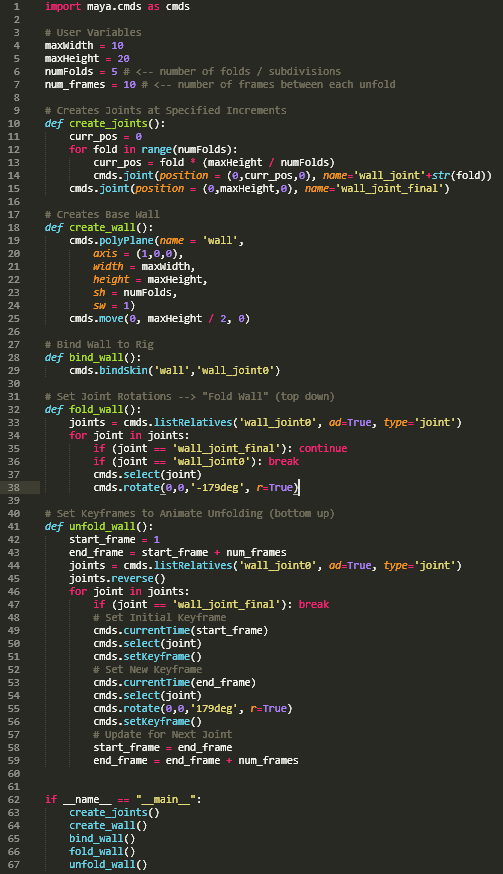
Given how tedious it would be to manually add joints for every wall and then to select and keyframe every joint by hand, I took the chance to practice and apply my Python scripting in Maya to automate the process. The result is what I was able to write and create in one day. The script (as shown below) instances and binds joints and subdivided geometry and adds appropriate keyframes to create the animation. The wall size, number of folds, and animation speed are all user parameters to add more control. After the script generated the base wall and animation, I added some more subtle follow-through animation at the top joint to make the motion a bit more organic. I was then able to export the animated mesh as a cached alembic, which allowed me to re-import the geometry and assemble a building structure from the wall components. By using alembics, I could easily re-time and offset each wall's unfolding individually to create a staggered unfolding effect that was much more controllable and art-directable than any other solution I had attempted earlier. While this is just a test render for now, I am excited to scale this approach to finally create the original vision I had a year ago and I am very happy to have found a more outside-the-box solution that proved to be quite effective.
While I was proud of my final Procedural Paper City and everything I had learned, my disappointment in being unable to figure out a viable solution had continuously lingered long after I left Pixar. It wasn't until a few months later that I had my moment of realization. While I was a TA for CS128: Intermediate Computer Animation, I had been helping the students learn to rig a character for the first time, and through becoming much more familiar with Maya's rigging tools, I realized that creating and animating a "wall skeleton" might have been the best solution this whole time.
Given how tedious it would be to manually add joints for every wall and then to select and keyframe every joint by hand, I took the chance to practice and apply my Python scripting in Maya to automate the process. The result is what I was able to write and create in one day. The script (as shown below) instances and binds joints and subdivided geometry and adds appropriate keyframes to create the animation. The wall size, number of folds, and animation speed are all user parameters to add more control. After the script generated the base wall and animation, I added some more subtle follow-through animation at the top joint to make the motion a bit more organic. I was then able to export the animated mesh as a cached alembic, which allowed me to re-import the geometry and assemble a building structure from the wall components. By using alembics, I could easily re-time and offset each wall's unfolding individually to create a staggered unfolding effect that was much more controllable and art-directable than any other solution I had attempted earlier. While this is just a test render for now, I am excited to scale this approach to finally create the original vision I had a year ago and I am very happy to have found a more outside-the-box solution that proved to be quite effective.